Just had a Picnic on a beach at Teluk Bahang Penang recently.
Will post pictures later. The Picnic starts at 10:30 am and we packed up at 10:30 pm. Decided to take the "Round Island Route" back to civilization. It was a cool drive in darkness with it's snaky twists and turns.
Here is a short brief take on the drive video I took using my handheld digital camera. ( not a very good one -apparently ).
Sunday, December 07, 2008
Picnic at Teluk Bahang - Penang - Dec 08


Tuesday, October 14, 2008
Pollen Filter replacement
 When you buy a used car or mpv, there are several things that needs to be fix. Depending on the previous owner, the amount of work needed to be done is inversely proportional to his/her passion. Here I've got a used MPV Peugeot 807 with 80K km on the clock. Everything else works but there are minor work to do to make it close to perfect. This is the first of the series of things that I have done.
In the coming days, I will try and add more helpful simple tips on my Peugeot 807.
This is the Pollen Filter ( Filter located at the engine bay to allow dust free external fresh air into the cabin ) will filter out all dust and small particles from entering into the cabin. All Peugeots I have owned 405/406/807 has this filter.

You can see the Pollen Filter housing once you open the bonnet. It is located just below where the rain wiper sits.


As you can see, the Pollen filter is already disintegrating. It has done it's fair share of service and is now "dead".!!

You can also see the quick release clips.
This is the underneath of the housing. There is a drain hose that is connected to it. When you pull the housing out, please also remove this hose first.It's just a simple twist and turn at the hose end to unsecure it. The challenging part is when you are installing it back the housing. You will have to twist and turn to secure it back. I wish you all the best. As a tip, put some water at the hose end to make it slippery and slide the hose back into this hole.

The new Pollen Filter is ready to go to work. Installation of the housing is pretty straight forward. Slide the housing into the bay, Twist and slide the hose ( wet the hose ends to make it slippery ) into the hole ( underneath). Secure the 2 screws ( clockwise half turn ) and then the quick secure clips.

Hope you guys have a good day ...
Tuesday, September 16, 2008
My People Mover Peugeot 807

Well ... this is my new people mover. It's a Petrol 2.0 GLX model. Kind of a basic model. It comes with D9 engine as with Peugeot 406/407 with 4 speed auto/Triptronic gear and comes with AL4 gearbox. Curtain airbags with auto sliding doors. One need to change the way this baby is driven. Not like a normal car. I need to learn to slow down. This is especially true if you are driving a 405 and a 406. I need to "adapt". But generally the handling for this 807 is not bad actually. Have not really had a chance to really stretch this baby yet. Anyway here is how it looks. ain't it gorgeous ?
Monday, June 23, 2008
Solex Carburettor Pdf files
Hi Guys,
I thought it would benefit those who are looking for information on Solex Carburettor that is used in Citroen & Peugeot cars.
I have this .pdf file on Solex carb. If you are interested please click
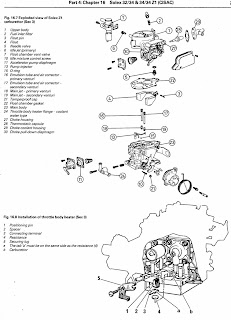
I am still getting requests for this file and I think if you have read all the comments , it was posted by Boris ( thanks buddy ) that he has made a DOWNLOAD LINK FOR ANYBODY WHO WANTS A COPY OF THE PDF FILE:
I think this would help you to get it faster.
Last I checked it stills works.
thanks and regards
Tuesday, April 29, 2008
Oil Cooler for Peugeot 406
It's been awhile since I have update this blog. Hope this new entry will cheer some of you up.
I happen to come across 1 Peugeot 406 ( D8 ) fixed with an additional ATF oil Cooler. The way my friend installed it by using Oil Cooler from Hayden Auto. The web link is here :-
As we all know the No# 1 killer for any auto transmission is HEAT. The Oil cooler that comes with the Peugeot 406 ( D8 ) is kinda small. But from my experience, it is apparently quite efficient and reliable as it is. However, if you still feel there is a need to add another one, please do so as this will definitely provides more cooling effect.

Here are the pics I took on my friends installation.
This is how it is installed. Kinda neat place to be. There are ample room to place this oil cooler. I believed if this is installed at the front air intake, the cooling effect will be much more efficient. This installation is in series with the original 406 cooler. So now he has 2 oil cooler. One is water cooled and the other is air cooled.

This is the Original installed oil Cooler that comes with the car. It is actually sealed. Noticed the coolant intake and outlet ? This is water cooled oil cooler.
If you intend to use the original Oil cooler in series to the new one, you will need to do some modification to the unit. You will need to drill open this unit to allow the ATF to flow out to the Hayden Oil Cooler and return. How this is done is to drill 2 holes. One for the outflow and one for the inflow. You will need to weld it with pipelike fabrication so as to allow the hose to secure the outlet and the inlet.
So here you have it.
Wednesday, October 03, 2007
Peugeot fuel gage indicator Phenomenon

This is how a fuel pump looks like. There are several types for different models of make but all performing the same purpose. They are immersed in the fuel tank which is right under the rear passenger seat. The thin film resistor with the float assy will provide fuel level signal to the meter at the dashboard. This carbon film resistor wears out over time and will give you the "swing" effect thus inaccuracies.
I have not found a replacement part for this as I believed ( I could be wrong ) it comes together with the fuel pump unit.
Friday, July 20, 2007
Peugeot 406 Rear 3rd Brake light

There are many questions as to the versions of the Rear 3rd Brake light. Is it LEDs or using the old filament bulbs. Well, there are 2 types actually.
For the benefit of all I have the pics of both. They both have their advantages and disadvantages. I personally like the LEDs ones as they consume less power and doesn't generate that much heat. The filament bulbs produces brighter light causing more heat that could warp the red plastic casing.
To replace the LEDs needs a little "spanner" know how. One will need to de-solder the burnt out LEDs and replace them using super bright ones which can be bought from electrical spare parts shops inexpensively.
As for the filament bulds replacement, it's easier by just pulling them off the housing and inserting them.
Both of the above requires careful removal of the whole light unit that are mounted on the roof. If you are not careful, you could break the whole casing. So do it with "passion"
Monday, July 09, 2007
Sunday Fun Drive

It starter out early at 9 am on the 8th Jul 07 at Seberang Jaya Mosque. A short briefing and the route map were given out.
The Road is wet. Probably just after a downpour. But the view of the surrounding green hills with low hanging clouds gives you a relaxing feel coupled with cabin temperature set at 23 degrees, IT IS COMFORTABLE !!!
I was going a bit too fast and did not get a better view of the bridge. But anyway, here it is. Maybe will do better next time.
I was following a Honda Stream that was going fast too. Here again the view gives you a sense of WoW feeling.
As we convoy into Lenggong. Notice the straight road infront ? Just too bad it's a double white line all the way .
Saturday, July 07, 2007
Sunday Fun Drive

A group of us decided take drive along the scenic Kulim - Grik highway. Will update the photos soon. But here is the Planned scheduled. I have also pasted the rough Map of the route we will be taking.( courtesy of Ooifa )
9.00 am: Start off from Seberang Jaya Mosque , use the BW Kulim Expressway Distance abt 20km toll RM 2.60
9.15 - 10.15am : Kulim to Grik . Distance 115Km , time estimate 1 hr, toll free
10.15 - 10.45am : Teh Tarik at Grik Batu 2 R&R 10.45am -2pm : Grik to Kuala Kangsar ( abt 94Km ) Along the way,suggest to visit the "Perak Man"(who should be 10,000 years old if still alive) at Muzium Arkeologi Lenggong. estimate to spend 1 hr there.Brief stopover at the Tasik Raban Resort before the Raja Muda Nazrin Bridge.Then have lunch at Sauk/Sauk New Village. Halal: Ikan Bakar. Non Syriah compliance: Steam fresh water fish at seafood restaurant.air liur meleleh woh!Eat durian as dessert. Buy Ikan Perkasam (local delicacy)
2pm - 3pm : Kuala Kangsar - JURU by Plus Highway . Distance abt 100km, toll RM13.60
3pm : High tea at Juru Autocity
Sunday, September 10, 2006
406 Cabin temperature Sensor Unit
If your cabin temperature goes haywire, this guy could be the culprit. The temp sensor is located above the head where the reading lights is located. The IR open/close door tx/rx is also housed there.
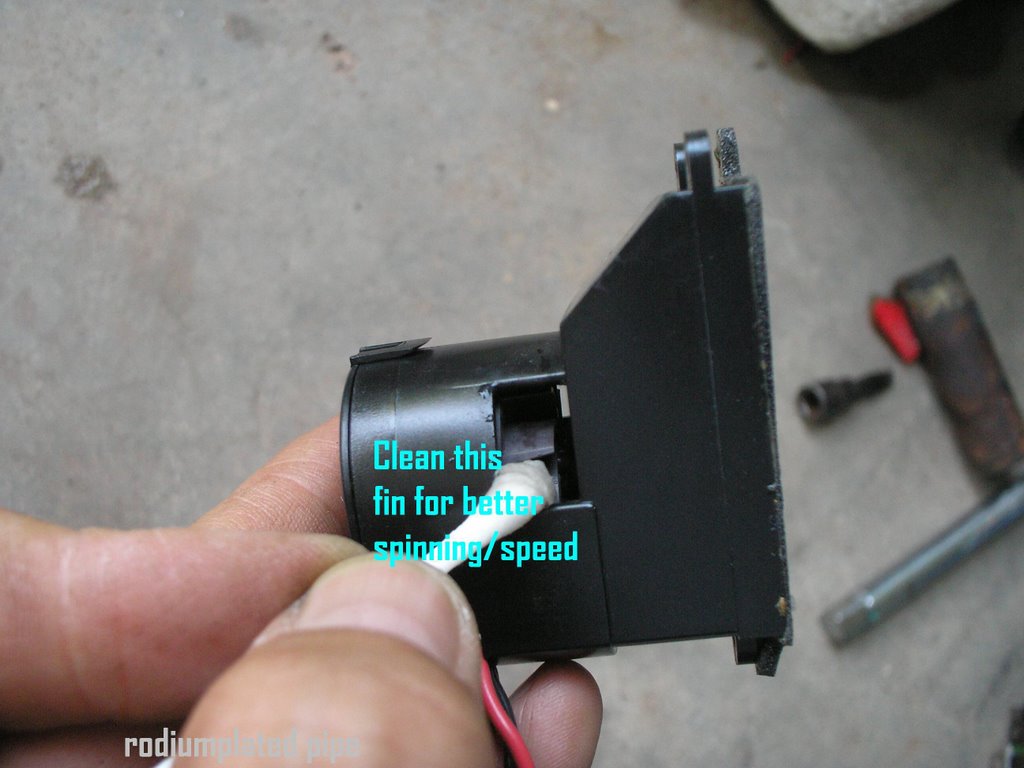
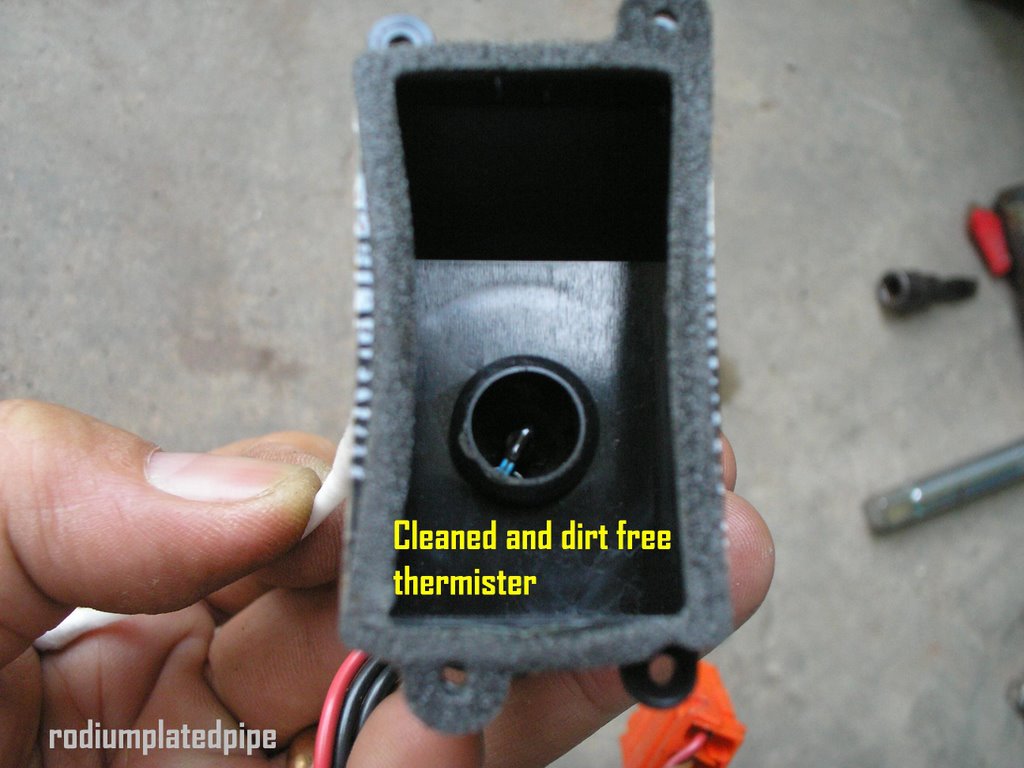
Took out the temp sensor unit and cleaned. Dirt was wrapping the sensor thus the feedback wasn't that responsive. It has a small dc fan that will suck in cabin air while the thermister will sense the temp which provide feedback signals to control the hot/cold air flap to mix the set/desired temperature. After cleaning the thermister and the fan fins, the unit now is more responsive.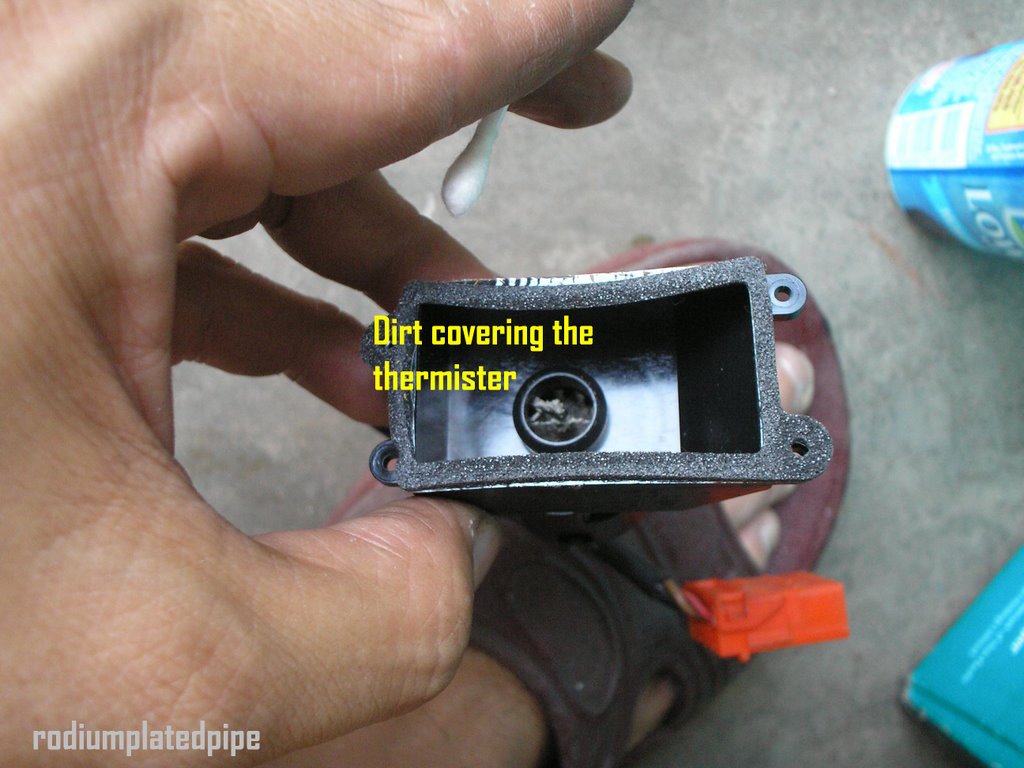
Damp/moist Cotton bud will do the trick. This is quite an easy task.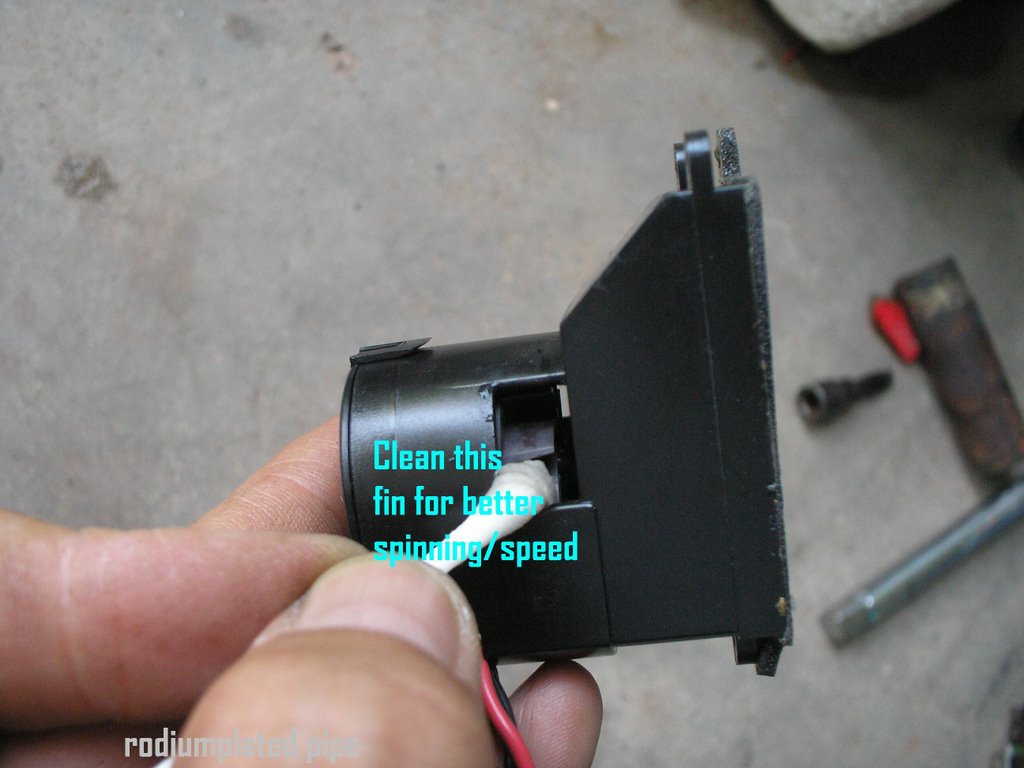
The Motor spins better and the thermister senses better now.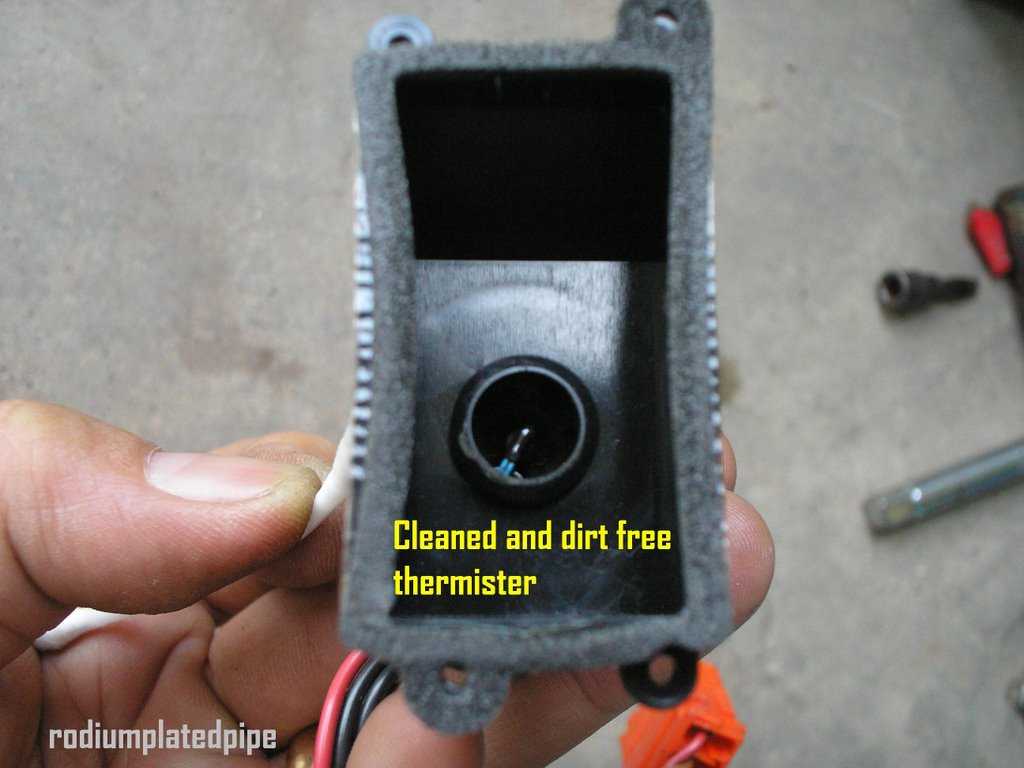
Happy Motoring..........
Subscribe to:
Posts (Atom)